Desktop controller · MIDI performance controller
Tweaker
Tweaker is a class-compliant, USB-powered MIDI control surface designed for custom mappings and performance. Its editor can reassign controls and LEDs, while 5-pin MIDI ports connect external hardware through a second computer-visible port.
Manuals, downloads & support ↓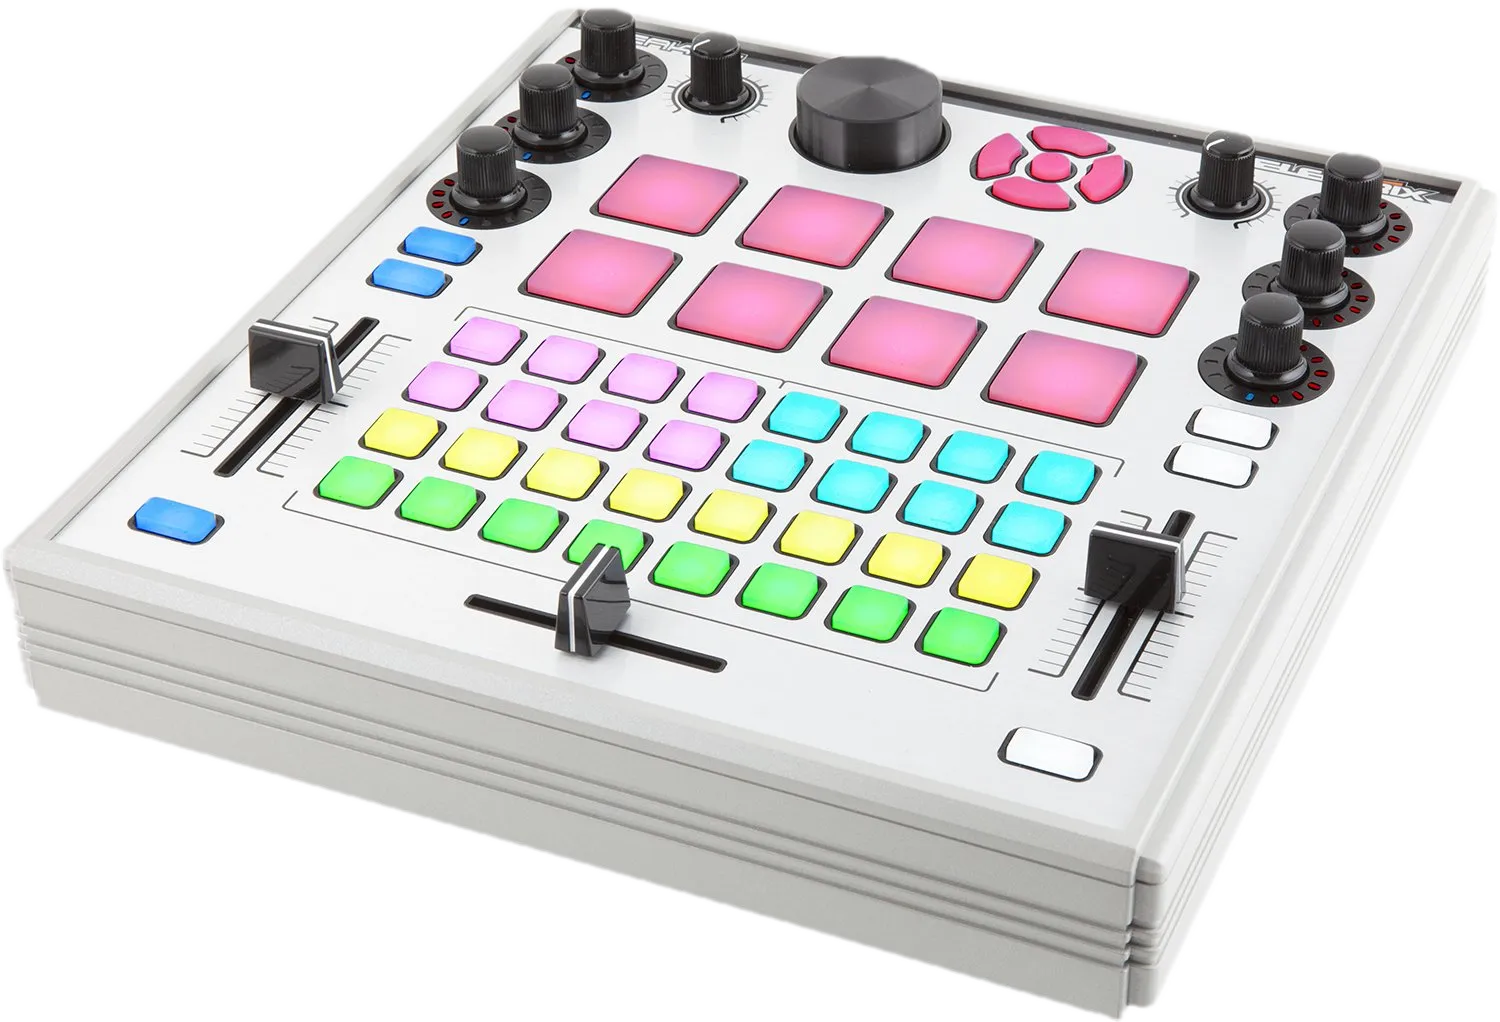
Key features
- 43 soft-touch buttons plus seven encoder push switches
- Eight velocity- and pressure-sensitive performance pads
- Seven encoders; six with LED position rings
- Five potentiometers and faders
- Class-compliant USB MIDI with bus power
- 5-pin MIDI in and out plus comprehensive remapping
Technical specifications
- Buttons
- 43 soft-touch buttons plus 7 encoder push switches
- Pads
- 8 velocity- and pressure-sensitive pads
- Encoders
- 7; six carry LED rings
- Continuous controls
- 5 potentiometers and faders
- Connections
- USB; 5-pin MIDI in and out
- Power
- USB bus powered
Controls and MIDI implementation
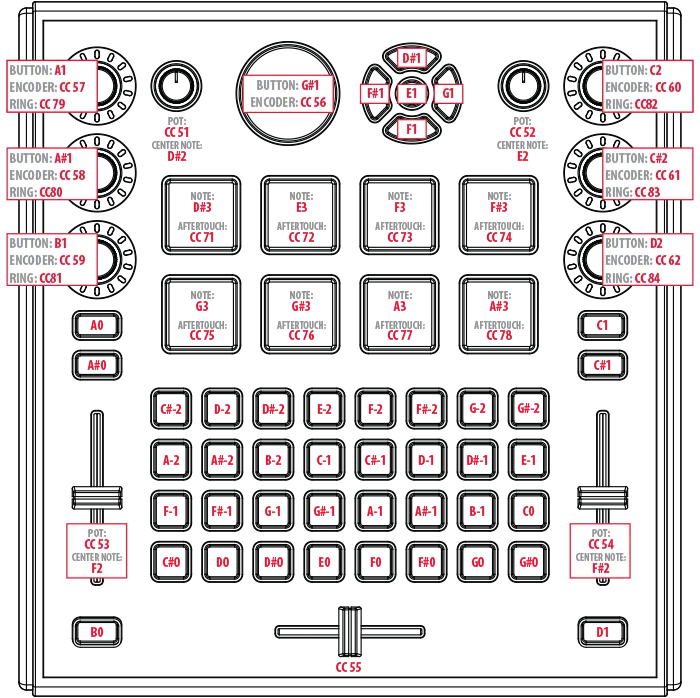
- Buttons38 RGB soft-touch buttons (notes 1–38), five navigation buttons (notes 39–43), and seven encoder push switches (notes 44–50)
- EncodersSeven on CC 56–62; six LED rings on CC 79–84
- PadsEight velocity pads on notes 63–70, with pressure on CC 71–78
- Faders and potsFive on CC 51–55, or notes 51–54 in center-note mode
- SysEx identityManufacturer ID
6A, product01; the full command reference is in section 6 of the manual - Original packageTweaker, four height-extension legs, USB cable, Quick Start poster, installation CD and two overlays
Connections
The USB port carries MIDI in both directions, powers the unit and handles firmware updates. Software sees it as Tweaker Port 1.
The 5-pin MIDI input routes external hardware to the computer as Tweaker Port 2. MIDI sent by the computer to that second port leaves through the 5-pin output, which also carries the Tweaker’s own data.
Overlay system
The face plate accepts printed performance overlays after the three fader knobs are removed. The enclosure seats an overlay around the controls and holds it in place during use.
Product support
Tweaker manuals, downloads and help
Setup instructions, compatibility guidance, every archived file and all 11 surviving FAQ answers now live on this page. No registration or email address is required.
Setup and maintenance shortcuts
- Set up Tweaker as an Ableton Live control surface.
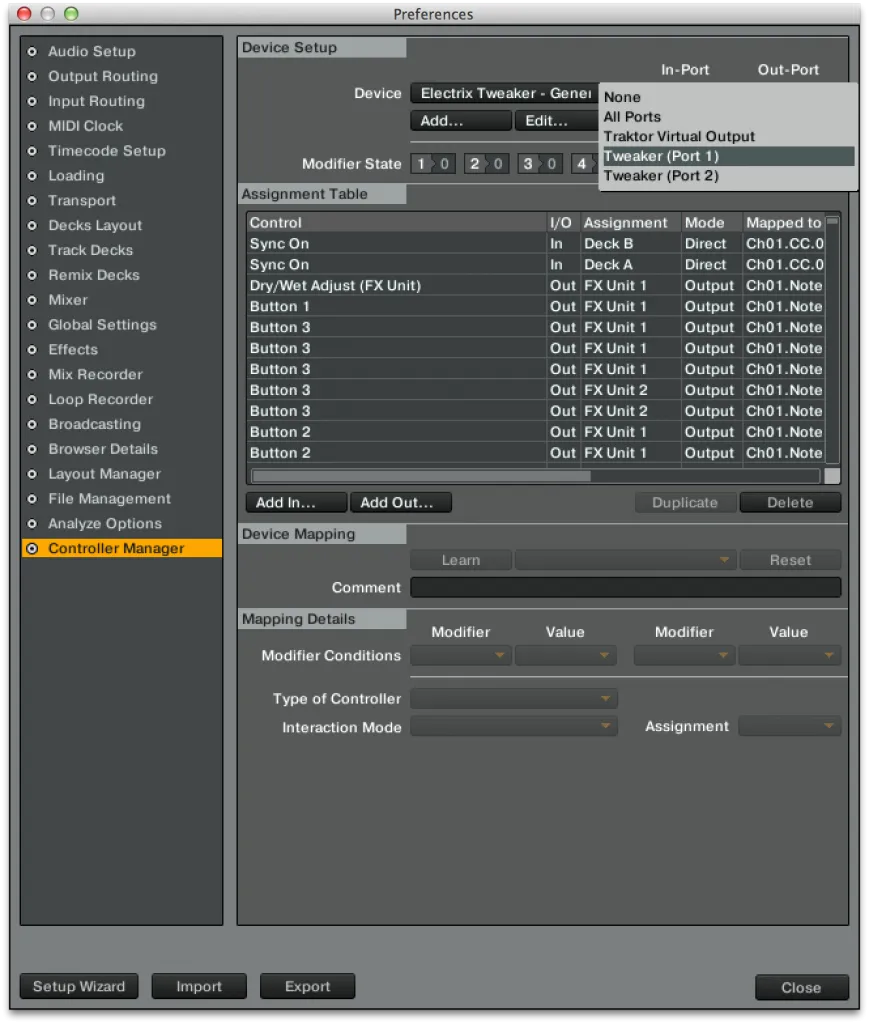
- Import Traktor mappings and assign Tweaker Port 1.
- Drive Ableton Drum Rack from the pads.
- Test MIDI input, output and LEDs in Tweaker Editor.
- Hardware LED test: hold the large navigation encoder while connecting USB; press it again to leave the test.
Overlays: print overlay PDFs at 100% scale—never “fit to page”—and remove the three fader knobs before fitting one.
Manuals and downloads
Documentation
Reference manuals for the hardware, the Editor, and each supported DAW.
- Tweaker User Manual Tweaker_User_Manual.pdf 2.4 MB Download Tweaker User Manual, PDF , 2.4 MB , opens in a new tab
- Traktor Reference Guide Traktor_Reference_Guide.pdf 2.0 MB Download Traktor Reference Guide, PDF , 2.0 MB , opens in a new tab
- Ableton Live Reference Guide Ableton_Live_Remote_Script_Guide.pdf 739 KB Download Ableton Live Reference Guide, PDF , 739 KB , opens in a new tab
- Tweaker Editor Reference Manual Tweaker_Editor_Reference_Manual.pdf 785 KB Download Tweaker Editor Reference Manual, PDF , 785 KB , opens in a new tab
Ableton Live remote scripts
Install the script that matches your exact version of Live. Ableton has broken third-party scripts across point releases, so version matching matters.
- Remote Script v1.0.5 — macOS Live 9.1.7 and higher 395 KB Download Remote Script v1.0.5 — macOS, ZIP , 395 KB , opens in a new tab
- Remote Script v1.0.5 — Windows Live 9.1.7 and higher 252 KB Download Remote Script v1.0.5 — Windows, ZIP , 252 KB , opens in a new tab
- Remote Script v1.0.3 — macOS Live 9.1.3 to 9.1.6 612 KB Download Remote Script v1.0.3 — macOS, ZIP , 612 KB , opens in a new tab
- Remote Script v1.0.3 — Windows Live 9.1.3 to 9.1.6 252 KB Download Remote Script v1.0.3 — Windows, ZIP , 252 KB , opens in a new tab
- Remote Script v1.0.2 — macOS Live 9.0 to 9.1.2 611 KB Download Remote Script v1.0.2 — macOS, ZIP , 611 KB , opens in a new tab
- Remote Script v1.0.2 — Windows Live 9.0 to 9.1.2 252 KB Download Remote Script v1.0.2 — Windows, ZIP , 252 KB , opens in a new tab
- Remote Script v1.0.1 — macOS Live 8.2.2 and higher 608 KB Download Remote Script v1.0.1 — macOS, ZIP , 608 KB , opens in a new tab
- Remote Script v1.0.1 — Windows Live 8.2.2 and higher 254 KB Download Remote Script v1.0.1 — Windows, ZIP , 254 KB , opens in a new tab
Traktor Pro 2 mappings
Import the .tsi in Traktor’s Controller Manager, then set both ports to Tweaker Port 1. Only one Tweaker mapping can be active at a time.
- Traktor Pro 2 — Decks A/B Requires Traktor Pro 2.5.1 or higher 87 KB Download Traktor Pro 2 — Decks A/B, ZIP , 87 KB , opens in a new tab
- Traktor Pro 2 — Remix Decks C/D Requires Traktor Pro 2.6.2 or higher 160 KB Download Traktor Pro 2 — Remix Decks C/D, ZIP , 160 KB , opens in a new tab
- Traktor Pro 2 — Track Preparation Requires Traktor Pro 2.5.1 or higher 93 KB Download Traktor Pro 2 — Track Preparation, ZIP , 93 KB , opens in a new tab
Serato Scratch Live mappings
Overlays and templates
Print at 100% scale — do not let your PDF reader "fit to page".
Tweaker Editor
The configuration app for remapping every control, testing MIDI, saving presets, and restoring factory defaults.
- Tweaker Editor v1.0.1 — macOS TweakerEditor_v101_OSX.zip 24 MB Download Tweaker Editor v1.0.1 — macOS, ZIP , 24 MB , opens in a new tab
- Tweaker Editor v1.0.1 — Windows installer TweakerEditor_1.01_Installer_WIN.zip 17 MB Download Tweaker Editor v1.0.1 — Windows installer, ZIP , 17 MB , opens in a new tab
Frequently asked questions
The questions that actually came in over the years, corrected only where an operating system has since moved the setting being described.
Ableton Live
How do I uninstall the Ableton Live 9 remote script?
To uninstall the remote script, navigate to Live's MIDI Remote Scripts folder and delete the folders named Tweaker and TweakerNav.
Windows
Ableton Live 9's default installation location is the ProgramData folder on the C: drive (C:\ProgramData). This folder is hidden by default, so you may need to set Windows to show hidden files and folders.
- Go to
ProgramData › Ableton › Live 9 › Resources › MIDI Remote Scripts - Scroll down to the
TweakerandTweakerNavfolders, then select and delete them.
macOS
Ableton Live 9's default installation location is the Applications folder.
- Find Ableton Live 9 in Applications, right-click the icon and choose Show Package Contents.
- Go to
Contents › App-Resources › MIDI Remote Scripts - Scroll down to the
TweakerandTweakerNavfolders, then select and delete them.
The remote script installer says "disk is damaged" on macOS. How do I fix it?
If you hit a "disk is damaged" error while installing the Ableton Live remote script, you need to change your Gatekeeper settings or allow the installation manually.
Gatekeeper prevents the installation of unsigned or unknown applications on macOS. You will find its options under:
Apple menu › System Settings › Privacy & Security — look under the heading for allowing applications downloaded from identified developers. On older releases of OS X this lived at Apple menu › System Preferences › Security & Privacy › General.
A quicker route that avoids changing the system-wide setting: right-click (or Control-click) the installer and choose Open, then confirm at the prompt.
Apple documents the behaviour at support.apple.com/en-us/HT202491.
How do I set up Ableton Live's Drum Rack to work with the Tweaker?
For Ableton Live's Drum Rack to respond to the Tweaker:
- Set MIDI From on the Drum Rack's host MIDI track to Tweaker (Port 1).
- Set the MIDI channel to All Channels or Channel 10.
- Arm the track for recording so that MIDI input triggers the Drum Rack pads.
Note: Track Input must be enabled for the Tweaker's In port in Live's MIDI preferences.
Which Tweaker remote script version do I need for my version of Ableton Live?
Ableton has occasionally made changes that break third-party remote scripts in software updates, so there are several versions of the Tweaker remote script for different versions of Live. Make sure you install the correct script for your version — especially if you have more than one Live installation on the same computer.
| Tweaker remote script | Works with |
|---|---|
| v1.0.5 | Live 9, versions 9.1.7 and higher |
| v1.0.3 | Live 9, versions 9.1.3 to 9.1.6 |
| v1.0.2 | Live 9, versions 9.0 to 9.1.2 |
| v1.0.1 | Live 8, versions 8.2.2 and higher |
All four versions remain available in the downloads section above.
How do I set up the Tweaker as a control surface in Ableton Live?
Before you start: the Tweaker remote script must already be installed. Download it from the downloads section above and check the version compatibility table.
For Live to respond to the Tweaker's commands it must be set up as a control surface in Live's MIDI preferences. Once the remote script is installed it becomes available in Live's control surface chooser.
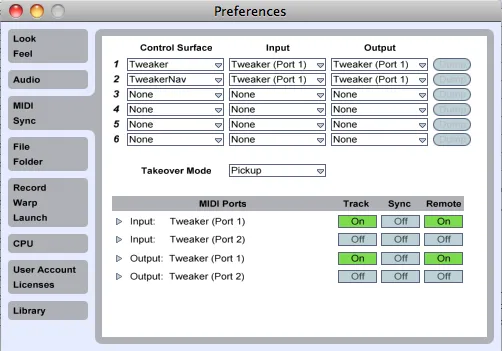
- Open Live's Preferences window and select the MIDI/Sync tab.
- Select Tweaker from the first control surface chooser.
- Select TweakerNav from the second control surface chooser.
- Set the inputs and outputs for both control surfaces to Tweaker (Port 1).
- Make sure Track and Remote are both switched on for Tweaker (Port 1) in the MIDI Ports list.
Traktor
How do I install the Traktor .tsi mappings?
Three mappings are available from Electrix: Decks A/B, Remix Decks C/D, and Track Preparation. All three are in the downloads section above.
1. Download
Save the .tsi into Traktor's settings folder. Right-click the mapping file, choose Save target as, and navigate to:
Home › Documents › Native Instruments › Traktor 2.x.x › Settings
2. Install
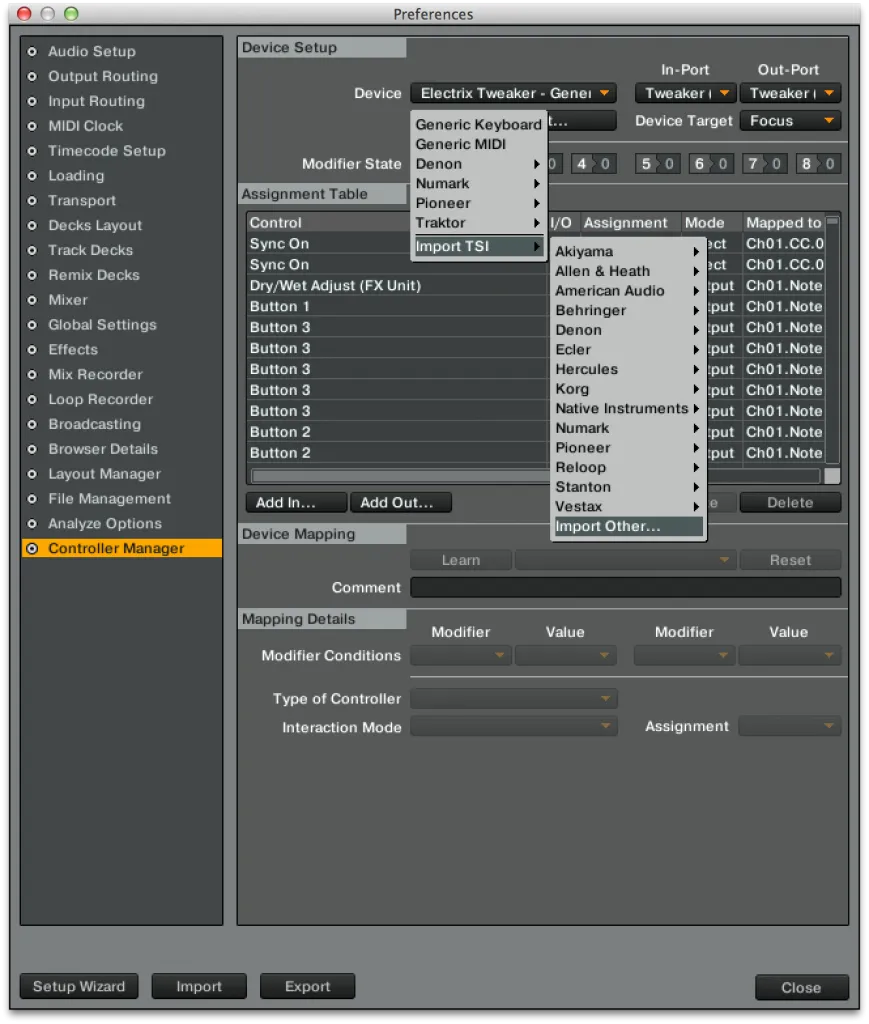
- Launch Traktor, open Preferences, and click the Controller Manager tab.
- Under Device Setup, click Add and choose Import TSI › Import Other.
- Navigate to Traktor's settings folder and select the TSI file you want to install.
3. Set the ports
Ports represent the physical connections on your hardware. Setting them tells Traktor where to send and receive MIDI. Multiple mappings assigned to the same ports will make the hardware behave erratically, because it receives conflicting messages.
- Under the In Port and Out Port pull-down menus, set the mapping you are using to Tweaker Port 1 — that is the USB port.
- Only one Tweaker mapping can be active at a time. Set every other Tweaker mapping to None.
Tweaker Editor
How do I check my MIDI settings using the Tweaker Editor tools?
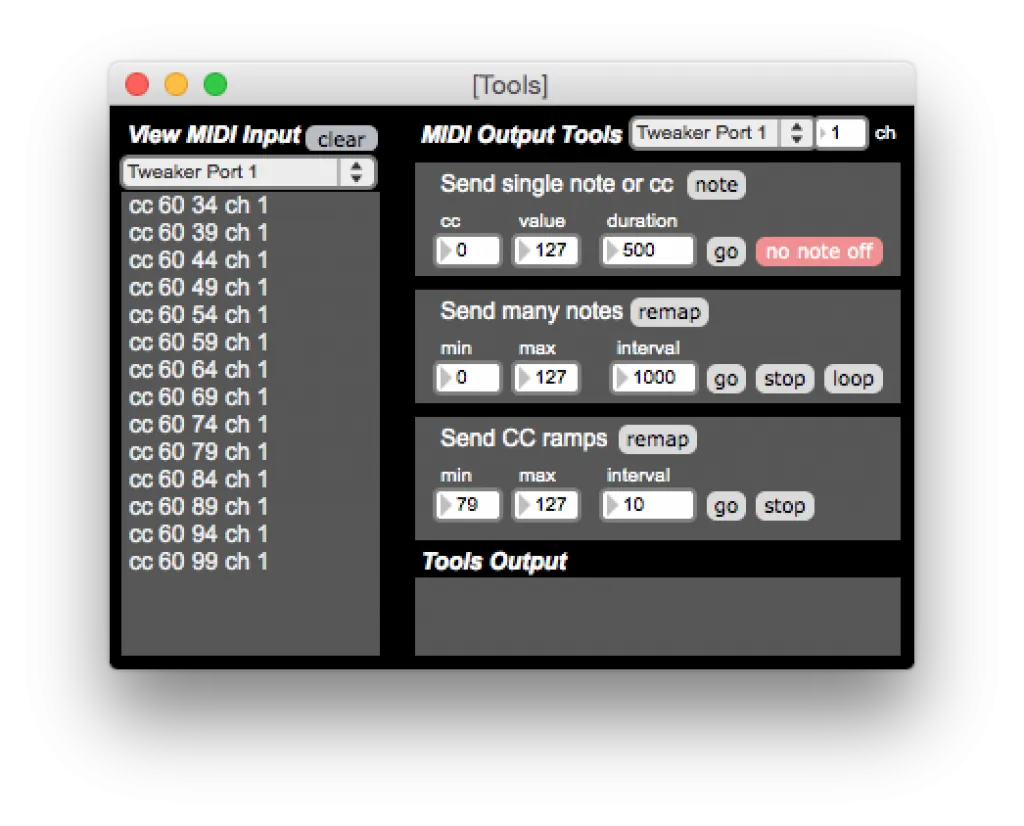
The Tweaker Editor includes several tools for testing your MIDI and hardware settings, covering both MIDI input and MIDI output. To open the Tools window, click the Tools button in the lower right-hand corner of the Tweaker Editor window.
Testing MIDI input
The View MIDI Input tool shows messages sent by the Tweaker. With the window open, move any control on the hardware and watch the incoming messages appear in real time.
Set the correct port from the pull-down menu. The default is Tweaker Port 1, which is the USB port on the Tweaker. If you are using the MIDI connections, or you have more than one Tweaker connected, change this value.
Testing MIDI output and LEDs
The MIDI Output Tools let you send messages to the Tweaker. This is most commonly used to test the LEDs.
Try this: under Send Many Notes, change the interval to 100 (the default is 1000), press Go, and watch the LEDs trigger across the Tweaker. You have just sent note-on and note-off messages to every control sequentially. The min value is the first note and the max value is the last note in the range — note 0 is the first button in the grid, and note 70 is the last drum pad. The interval controls how quickly each note fires.
You will notice the LED rings do not respond to Send Many Notes. The rings are driven by control change (CC) messages rather than note messages, so use the Send CC Ramps tool to test them instead.
How do I reset the Tweaker to factory defaults?
The Tweaker is a highly customizable control surface — which also means it is easy to get into a strange state. If your Tweaker is behaving oddly, or factory mappings are not responding correctly, reset it to factory settings using the Tweaker Editor.
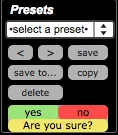
Before you reset: save your current settings as a preset so you can recall them later. The Tweaker Editor Reference Manual covers saving presets.
- Press the RESET TO DEFAULTS button at the bottom of the Tweaker Editor control panel. You will be asked to confirm before the change is committed.
- Press SAVE TO TWEAKER to write the default settings back into the Tweaker's on-board memory.
Firmware & hardware
What are the Tweaker’s default MIDI note and CC assignments?
The following is the Tweaker's factory default MIDI note and CC configuration. Everything is on MIDI channel 1 unless noted.
| Control | Mapping | Notes |
|---|---|---|
| Soft touch buttons | MIDI notes 1–38 | No speed control buttons enabled |
| RGB LEDs | MIDI notes 1–38 | Auto-light (local control): off |
| Soft touch navigation buttons | MIDI notes 39–43 | Red LEDs, auto-light off |
| Encoder push buttons | MIDI notes 44–50 | Blue LEDs, auto-light off |
| Potentiometers and faders | CC 51–55 (normal), notes 51–54 (center-note) | — |
| Force sensitive pads | MIDI notes 63–70 and CC 71–78 | Red LEDs, auto-light off |
| Rotary encoders | CC 56–62 | Speed 1: 5, Speed 2: 1. Absolute mode, except the navigation encoder which is relative. |
| LED rings | CC 79–84 | Encoder link on, ring mode EQ |
General MIDI settings
- Local control: off
- Omni channel: off
- External MIDI jacks: enabled
How do I update the Tweaker firmware?
Check your current firmware version before updating.
- With the Tweaker unplugged, hold down the round rubber button in the centre of the four directional navigation buttons while connecting the Tweaker to your computer.
- A volume named TweakerDisk will mount on your system.
- Drag the Tweaker firmware binary file and drop it onto the TweakerDisk volume.
- The velocity pads will flash while the firmware updates. Do not disconnect the USB cable during this process.
- Once the pads stop flashing it is safe to disconnect. Reconnect the Tweaker to return to normal operating mode.
How do I check my Tweaker's firmware version?
The current — and final — firmware version is 5.2.
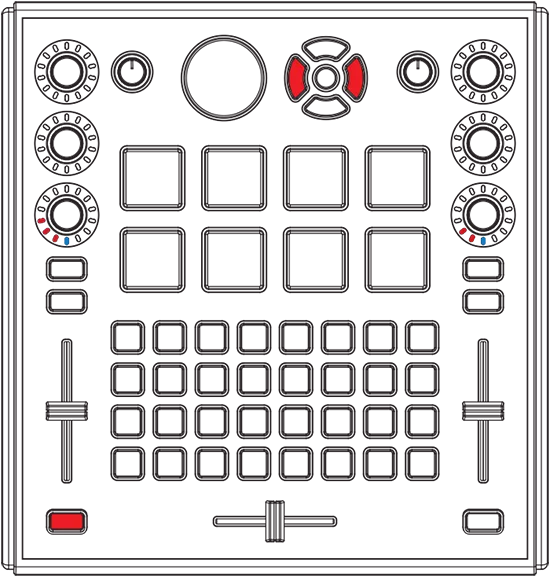
You can check your version at any time by holding down the three buttons indicated in the Tweaker User Manual. While they are held, the firmware version is shown on the bottom encoder LED rings of both mixer channels.
- The left LED ring indicates the number before the decimal point.
- The right LED ring indicates the number after the decimal point.
Count both the red and the blue LEDs. For version 5.2, five LEDs light on the left ring and two light on the right.
Note: if you think you have 4.1, you most likely have 5.2 — make sure you are counting both the red and blue LEDs.